PPU Simulator
This is a “PPU Simulator”.
The idea is to serve as a complement to the post of the Homebrew Console’s Video, for a better understanding on how the CPU interacts with the PPU.
If you don’t know what this is or why it is, check out my first post here.
This is not very “mobile-phone friendly”, nor it is extremely optimized, I apologize for that.
In the end of this page you’ll find instructions if needed.
Instructions
The Output has an emulation of the PPU rendering function according to the PPU-RAM state represented in the PPU-RAM section.
It only simulates the PPU Mode CHR-RAM (first byte of the PPU-RAM set to 1, any other value will be ignored).
You can change any value of the PPU-RAM (except of the first byte). Just click on a value and change its value, if the its valid (between 0 and 255) then you’ll see its effects as you’re changing it. You can use hexadecimal numbers as well, just use the “0x” prefix.
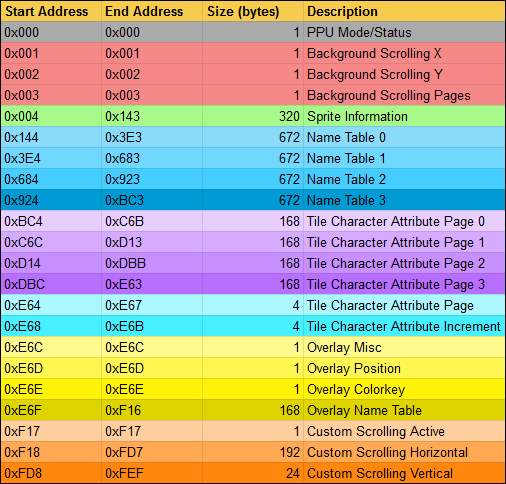
Here is the PPU-RAM layout:
You can also load your own graphics to the CHR-RAM.
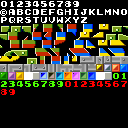
As the CHR-RAM is a set of 8x8 pixel characters, to do this, just use an image with one or more characters, so the image needs to be a multiple of 8 of width and height (this would be an example).
Then pick where to load the characters: Tile or Sprite, Page number and character.
The characters will be loaded starting from the selected character.
The image will have its colors converted to RGB332 by rounding its RGB values.
In the same section, I’ve added a way to inspect characters so as to check which colors have been attributed to each character. This is useful when setting colorkeys. To do this, just hover over a character.
At last but not least, I thought it would be cool to make things “move” and to make it possible to see the effects of change over time in the PPU-RAM.
So, I’ve added 2 javascript scripts to the page, OnInit and OnFrame.
These scripts will be the bodies for two functions, the first script is executed once at the start (can be used for initializing) and the other will be executed at 25fps.
They will be updated and run when you press “Run”.
There are some pre-written scripts in a dropdown “Examples”.
The idea of these scripts is to interact with the PPU by setting values to the PPU-RAM (as a CPU would do), in order to do this, just like in the example, use “ppu.setPPURAM(address, value)” and to get a value from the PPU-RAM, “ppu.getPPURRAM(address)”.
Use byte values (from 0 to 255). If you force different values, unexpected behaviour will happen. The same will happen in particular addresses, such as setting the horizontal scroll values higher than 223 or the vertical ones higher than 191.
If you need to store state, you can just use the “window” object, for example “window.programState = { spriteActive: 1 };”.
You can also use the browser developer console directly if you like.
Just set the “ppu._options.onInit” and “ppu._options.onFrame” with functions. And then do “ppu.start()”:
ppu.stop();
ppu._options.onInit = function() {
    ...
};
ppu._options.onFrame = function() {
    ...
};
ppu.start();
If you like this and wish to use the code somewhere else, go ahead (it would be cool if you could put a link to this blog and if you could let me know you’re using it, it would be awesome, it let’s me know this is actually useful).
If you don’t understand what’s happening in this page, check out the other blog posts or contact me through twitter, or by writing a comment.
As always thank you for reading my blog posts.